Click the ![]() Amendment Manager link from the list of Project Items.
Amendment Manager link from the list of Project Items.
For each Source or Target CRF version combination, the system requires a migration plan before CRF version migration can be executed. There can be only one Migration Plan for each Source or Target CRF version combination.
Each migration plan consists of mappings of the following objects from the Source to the Target version:
For each object, the system attempts to find a match by OID. If no match is found, the system sets the source as Do Not Migrate for the Target version. For each mapping, the system performs a detailed analysis to look for potential issues based on the plan configuration. For example, a field mapping could generate a break signature event on a change of field label. If there are issues with mapping, each issue is tagged as an error. A migration plan cannot be executed until there are zero errors.
Navigate to the Architect main page from the list of modules on the Rave home page.
Select a project from the list of Active Projects.
Click the ![]() Amendment Manager link from the list of Project Items.
Amendment Manager link from the list of Project Items.

The Amendment Manager page initially displays a drop-down list of Source and Target CRF versions in the Project with the words Select displayed in the drop-down lists. CRF versions are listed in reverse sort order with the most recent versions listed at the top of the list.

Note: If you select a Source and Target CRF version and navigate to another tab in Amendment Manager, the previously selected Source and Target CRF versions will remain selected. Source and Target CRF versions are only reset if you log out of Rave. The migration plan is also reset if either the Source or Target CRF version is deleted.
Select a Source and Target version from the drop-down list to generate a migration plan.
Click ![]() Create Plan button.
Create Plan button.

Note: The system only displays the Create Plan button if no plan has been generated previously for the Source and Target CRF versions or if the plan for the Source to Target CRF has been deleted.
The Create Plan page displays. This page can also be accessed in Amendment Manager by clicking the ![]() Create Plan link in the left navigation pane. The system auto-generates a plan by mapping objects against their OIDs. Errors are displayed for review at the top of the Create Plan page.
Create Plan link in the left navigation pane. The system auto-generates a plan by mapping objects against their OIDs. Errors are displayed for review at the top of the Create Plan page.

Note:If the CRF Source and Target versions are identical, the system displays an error stating that the Source and Target versions must be different.
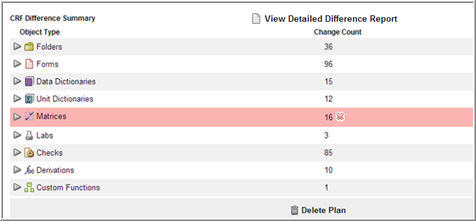
If the Source and Target CRF version combination has an existing plan, the Edit Migration Plan links are enabled in the left navigation pane, and the system displays the CRF Difference Summary (with a link to the CRF Differences Report). The CRF Difference Summary displays all the CRF Object Types to be migrated from the Source to Target and includes data representing differences between the objects in the Source and Target CRF versions.

The following columns show in the CRF Differences Summary Report:
|
Column Name |
Description |
|
Object Type |
CRF Object types - Folders, Forms, Data Dictionaries, Unit Dictionaries, matrices, Labs, Checks, Derivations, Custom Functions |
|
Change Count |
Count of all changes between Source and Target CRF versions. CRF Object Types that have no differences show a 0 (zero). |
If the migration plan has not been run in a Production environment, a Delete Plan link displays and you have the option to delete the plan to start over again. Objects that contain errors are highlighted in red. Click the expand arrow to show the specific Object that contains an error.
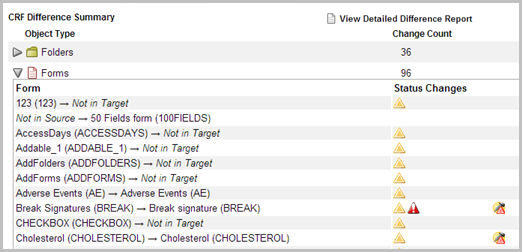
Status changes are indicated for Folders, Forms, Fields, and Matrix objects that have status differences between the Source and Target versions. CRF objects that have more than one difference will have an expand arrow ![]() . Click the expand arrow to see details of CRF objects that contain differences. For status icons and their meanings, see Architect Icons. Placing your mouse over the status change icon displays a tool tip of the status. Note that break signature events that are indicated here are a result of the Configure Plan settings, and they are not from the changes to the CRF version within the Architect module.
. Click the expand arrow to see details of CRF objects that contain differences. For status icons and their meanings, see Architect Icons. Placing your mouse over the status change icon displays a tool tip of the status. Note that break signature events that are indicated here are a result of the Configure Plan settings, and they are not from the changes to the CRF version within the Architect module.

Note: The text of the error message displays at the top of the Create Plan page. Click the error row to link to Object Mapping page to resolve the error if it is a Folder, Form, Data Dictionary or Unit Dictionary error. Errors must be fixed in order for a Migration to take place. The Execute Plan link is not available until all errors are resolved. Errors for Matrices, Labs, Derivations, Checks, and Custom Functions will not link back to Object Mapping and must be resolved in the CRF draft.
To view the Report, click View Detailed Differences Report link to display a more comprehensive listing of the differences between Source and Target versions. See CRF Difference Report for more information.
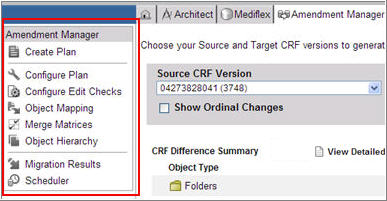
The following is a list of links that are necessary to further configure a migration plan. Each of the links below are displayed in the left navigation pane in Amendment Manager.

NOTE: Not all of the following options may apply to your Migration Plan:
Click the ![]() Configure Plan link to set Amendment Manager options on a per-plan basis. See Configuration Settings for Migration Plan, for more information.
Configure Plan link to set Amendment Manager options on a per-plan basis. See Configuration Settings for Migration Plan, for more information.
Click the ![]() Configure Edit Checks link to configure which edit checks should be run during the migration. See Configure Edit Checks, for more information.
Configure Edit Checks link to configure which edit checks should be run during the migration. See Configure Edit Checks, for more information.
Click the ![]() Object Mapping link to manually map folders, forms, fields, data dictionaries, and unit dictionaries between Source and Target CRF versions. These objects are shown as tabs at the top of the page, with their appropriate icon. See Mapping Objects for more information.
Object Mapping link to manually map folders, forms, fields, data dictionaries, and unit dictionaries between Source and Target CRF versions. These objects are shown as tabs at the top of the page, with their appropriate icon. See Mapping Objects for more information.
Click the ![]() Object Hierarchy link to manage folders and forms within the subject hierarchy between Source and Target versions. See Object Hierarchy, for more information.
Object Hierarchy link to manage folders and forms within the subject hierarchy between Source and Target versions. See Object Hierarchy, for more information.
Click the ![]() Merge Matrices link to force the system to re-apply a matrix during the migration. See Merge Matrices, for more information.
Merge Matrices link to force the system to re-apply a matrix during the migration. See Merge Matrices, for more information.
Click the ![]() Scheduler link to access the Scheduler page to schedule migrations. See Schedule Migration for more information about scheduling jobs.
Scheduler link to access the Scheduler page to schedule migrations. See Schedule Migration for more information about scheduling jobs.
Click the ![]() Execute Plan link to execute a migration, once all errors have been resolved in the source. The system takes all the subjects that have been selected for migration and migrates their data from the Source CRF version to the Target CRF version. See the Migration Execution Process, for more information.
Execute Plan link to execute a migration, once all errors have been resolved in the source. The system takes all the subjects that have been selected for migration and migrates their data from the Source CRF version to the Target CRF version. See the Migration Execution Process, for more information.
Click the ![]() Migration Results link to see all the information related to the history of all Migration jobs for the project. See Migration Results, for more information.
Migration Results link to see all the information related to the history of all Migration jobs for the project. See Migration Results, for more information.
Copyright © 2014 Medidata Solutions, Inc. All rights reserved.