Object Hierarchy enables you to select forms and folders in the Source CRF and define their location in the Target CRF, thus changing the hierarchy of the forms and folders between the Source and Target CRF versions. You can change the hierarchy of the folders and forms between Source and Target CRF versions by creating rules that can be applied during migration. Using Object Hierarchy, you can remove and delete folders and forms, create new instances of folders and forms, as well as, move folders and forms within the Target CRF version.
There are three actions that can be created from the Object Hierarchy page:
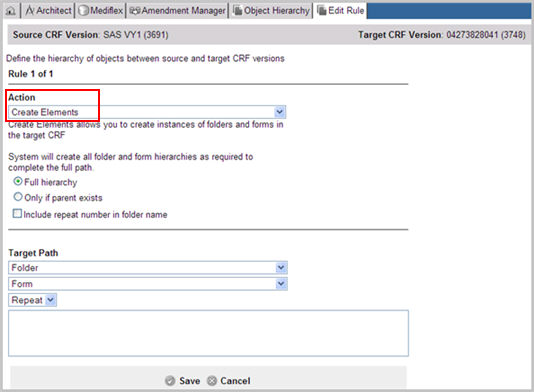
Create Action - Create Elements creates new instances of folders and forms in the Target CRF.
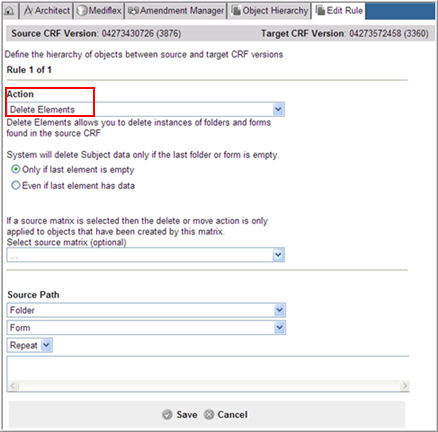
Delete Action - Delete Elements deletes instances of folders and forms in the Source CRF.
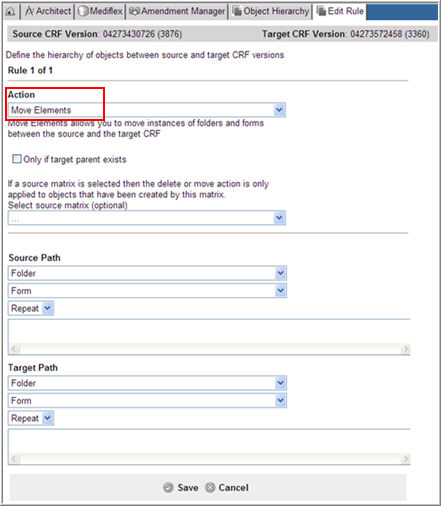
Move Action - Move Elements moves instances of folders and forms between the Source and Target CRF.
Note: There is no validation between the many rules that can be created for a migration plan. For example, if the first rule deletes a folder in the source and a second rule is set to move the deleted folder, Object Hierarchy will allow the plan to be saved, and during the migration, the move action will simply be ignored if the source folder cannot be found.
A Create Elements Rule allows you to create instances of folders and forms in the Target CRF version.
The Create Action Rule has a Source Path of [NULL] and has a valid Target Path. Having a [NULL] Source Path indicates that the Target Path does not exist in the Source and must be created by Object Hierarchy during migration.
Important: For syntax and behavior rules that apply for Create actions, see Create Action Rules.
Select a project on the Architect main page and navigate to the Project main page.
Select Amendment Manager and create a migration plan.
Select Object Hierarchy link for the migration plan from the list of items on the left navigation pane.
The Object Hierarchy page displays existing rules (if any). The rule displays the ordinal for the rule, the Source OID Path, the Target OID Path, and the Action of the rule. You can Add Rule or Edit an existing Rule on this page.

Note: If the Migration plan has set any objects in the Object Mapping section to "Do Not Migrate", these rules display in Object Hierarchy. These rules are read-only and are the last ones to be applied in the order of execution during a migration.

Click Add Rule ![]() to create a new rule. The Edit Rule page displays.
to create a new rule. The Edit Rule page displays.

Select Create Elements from the Action drop down list. This action is selected by default.
Click on Full Hierarchy to create as many folder and form hierarchies as necessary to complete the full path in the Target CRF version. The option of [Subject] from the drop down indicates the subject level as the root of the path.
(OR) Click on Only if parent exists to create the last element of the path only if the element's parent exists in the Target CRF version for the subject.
Check box Include repeat number in folder name to display the repeat number for newly created folders in Target CRF version.
In Target Path, select from the drop down list of folders in the Target CRF version, including [NULL], [Subject], wildcard '*'. Default is '...'.
In Target Path, select from the drop down list of forms in the Target CRF version, including wildcard '*'. Default is '...'.
(Optional) In Target Path, select from the drop down list of Repeat Numbers, including (1-9), (A-D), '*', and blank. Default is 'Repeat'.
When selecting Repeat in the Target Path:
Select wildcard '*' to allow the system to use all known repeats of the folder or form. If none is used, a repeat number of 1 is used.
Select 'blank' to allow the system to use the first repeat of the folder or the form.
Select a value in parenthesis to declare a global variable to hold a repeat number to be used later in another rule.
Selections from the Target Path automatically populate in the text area. You can edit this text directly if you know the path.
Click Save ![]() to save the rule as defined in the selected fields.
to save the rule as defined in the selected fields.
(Optional) Click Cancel ![]() to deselect the current selections and return to the Add Rules page.
to deselect the current selections and return to the Add Rules page.
A Delete Elements rule allows you to delete instances of folders and forms in the Source CRF version.
The Delete Action Rule has a valid Source Path and has [NULL] as Target Path. Having a [NULL] Target Path indicates that the specific object exists in the Source and will be deleted in Target.
Important: For syntax and behavior rules that apply for Delete actions, see Delete Action Rules.
Select Object Hierarchy link for an existing migration plan from the list of items on the left navigation pane on the Migration Home page.
The Object Hierarchy page displays existing rules (if any). The rule displays the ordinal for the rule, the Source OID Path, the Target OID Path, and the Action of the rule. You can Add Rule or Edit an existing Rule on this page.

Click Add Rule ![]() to create a new rule. The Edit Rule page displays.
to create a new rule. The Edit Rule page displays.
Select Delete Elements from the Action drop down list.

(Optional) Click on Only if last element is empty to only delete subject data only from the last element of the folder and form path if they are empty.
(Optional) Click on Even if last element has data to delete subject data from the last element of the folder and form even if they have data.
(Optional) Select a source matrix from the drop down list of matrices to the delete action to only those objects that have been created by the selected matrix.
In Source Path, select from the drop down list of folders in the Source CRF version, including [NULL], [Subject], wildcard '*'. Default is Folder.
In Source Path, select from the drop down list of forms in the Source CRF version, including wildcard '*'. Default is Form.
In Source Path, select from the drop down list of Repeat Numbers, including (1-9), (A-D), '*', and blank. Default is 'Repeat'.
When selecting Repeat in the Source Path:
Select wildcard '*' to allow the system to use all known repeats of the folder or form. If none is used, a repeat number of 1 is used.
Select 'blank' to allow the system to use the first repeat of the folder or the form.
Select a value in parenthesis to declare a global variable to hold a repeat number to be used later in another rule.
Selections from the Source Path automatically populates in the text area. You can edit this text.
Click Save ![]() to save the rule as defined in the selected fields.
to save the rule as defined in the selected fields.
(Optional) Click Cancel ![]() to deselect the current selections and return to the Add Rules page.
to deselect the current selections and return to the Add Rules page.
The Move Elements rule allows you to move instances of folders and forms between the Source and Target CRF versions.
The Move Element rule has a valid Source and a valid Target Path. Having a valid Source Path and Target Path indicates that the object exists in both the Source and the Target. The location of the object will change based on the conditions set in the Move Rule in Object Hierarchy.
Important: For syntax and behavior rules that apply for Move actions, see Move Action Rules.
Select Object Hierarchy link for an existing migration plan from the list of items on the left navigation pane on the Migration Home page.
The Object Hierarchy page displays existing rules (if any). The rule displays the ordinal for the rule, the Source OID Path, the Target OID Path, and the Action of the rule. You can Add Rule or Edit an existing Rule on this page.

Click Add Rule ![]() to create a new rule. The Edit Rule page displays.
to create a new rule. The Edit Rule page displays.
Select Move Elements from the Action drop down list.

(Optional) Check box Only if target parent exists to move folders and forms between Source and Target CRF versions only if the target parent exists. If the system cannot find the parent folder or form, the move rule is ignored by the system.
(Optional) Select a source matrix from the drop down list of matrices to apply the move action only to objects that have been created by the selected matrix.
In Source Path, select from the drop down list of folders in the Source CRF version, including [NULL], [Subject], wildcard '*'. Default is Folder.
In Source Path, select from the drop down list of forms in the Source CRF version, including wildcard '*'. Default is Form.
In Source Path, select from the drop down list of Repeat Numbers, including (1-9), (A-D), '*', and blank. Default is 'Repeat'.
Selections from the Source Path automatically populates in the text area. You can edit this text.
In Target Path, select from the drop down list of folders in the Target CRF version, including [NULL], [Subject], wildcard '*'. Default is '...'.
In Target Path, select from the drop down list of forms in the Target CRF version, including wildcard '*'. Default is '...'.
In Target Path, select from the drop down list of Repeat Numbers, including (1-9), (A-D), '*', and blank. Default is 'Repeat'.
When selecting Repeat in both Source and Target path:
Select wildcard '*' to allow the system to use all known repeats of the folder or form. If none is used, a repeat number of 1 is used.
Select 'blank' to allow the system to use the first repeat of the folder or the form.
Select a value in parenthesis to declare a global variable to hold a repeat number to be used later in another rule.
Selections from the Source Path or Target Path automatically populates in the text area. You can edit this text.
Click Save ![]() to save the rule as defined in the selected fields.
to save the rule as defined in the selected fields.
(Optional) Click Cancel ![]() to deselect the current selections and return to the Add Rules page.
to deselect the current selections and return to the Add Rules page.
Copyright © 2014 Medidata Solutions, Inc. All rights reserved.