Amendment Manager, by default, only runs edit checks that are different between the Source and Target CRF versions. Users can override this system default behavior by manually configuring on a per-edit check basis to force additional checks to run.
Note: If there are no corresponding edit checks in either the Source or Target matrix, nothing displays in either the Source Edit Check or the Target Edit Check column. This occurs if a new edit check is created in the Target CRF version, or if an edit check in the Source version is deleted.
Select a project on the Architect main page and navigate to the Project main page.
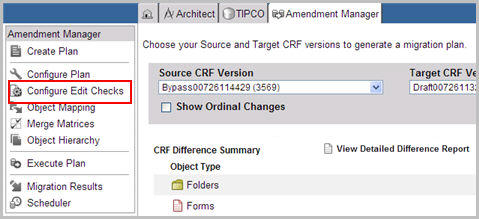
Select Amendment Manager link from the list of Project Items on the left navigation pane.
Select a Source CRF and a Target CRF version combination that has an existing plan.

Select Configure Edit Checks from the list of items on the left navigation pane.

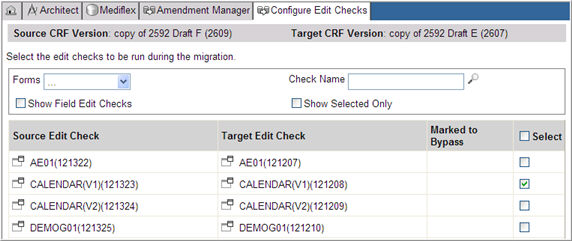
The Configure Edit Checks page displays. The page displays edit checks for the selected Source and Target CRF versions with check boxes to select the edit check to run after migration.
Note: The Marked to Bypass column shows read only information on edit checks that were previously selected to bypass during migration (if any).

Note: If there is no corresponding edit check in either the Source or Target matrix, a blank space displays below the filter section. This occurs if a new edit check is created in the Target CRF version or an edit check in the Source CRF version is deleted.
Edit Checks are checked by default in the Select column when the following occurs:
The edit check exists only in the Target CRF version
The edit check has changed between CRF versions
The edit check has data that has changed between CRF versions
The edit check has not changed but the custom function called by that edit check has changed
Field edit checks (e.g. SYS_) are not selected to run by default.
Edit Checks that set a dynamic search list, even if they have not changed between CRF versions.
The following table shows the likelihood of a check that is run by the system:
|
Did Data Point Change as a result of Migration? |
Bypass during Migration |
Select to run in Configure Edit Checks |
Result |
|
Yes |
Checked or Unchecked |
Checked or Unchecked |
Edit Check will run (based on Configure edit Checks setting) |
|
No |
Checked or Unchecked |
Checked |
Edit Check will run |
|
Checked or Unchecked |
Unchecked |
Edit Check will not run |
To include field edit checks in the table, check the Show Field Edit Checks check box. Click the Filter ![]() icon. Default is Unchecked. When unchecked, field edit checks are not included in the table.
icon. Default is Unchecked. When unchecked, field edit checks are not included in the table.
To filter and include only system selected edit checks in the table, check the Show Selected Only check box. Click the Filter ![]() icon. Default is checked. When unchecked, regular Edit Checks and system selected edit checks display in the table.
icon. Default is checked. When unchecked, regular Edit Checks and system selected edit checks display in the table.
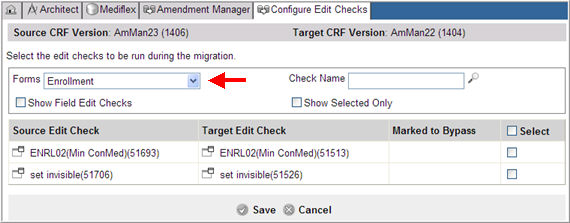
To filter Edit Checks assigned to a particular form, select from the Forms drop down list. Click the Filter ![]() icon. Default view displays all forms.
icon. Default view displays all forms.

To filter the list of edit checks by name, enter the name of the Edit Check in the Check Name text box. Click the Filter ![]() icon. This field is empty by default.
icon. This field is empty by default.
To see the Infix notation for the named Edit Check, click the Pop-up icon ![]() to the left of the Edit Check name. This view is helpful when you are looking for differences in the Edit Checks between the Source and Target versions.
to the left of the Edit Check name. This view is helpful when you are looking for differences in the Edit Checks between the Source and Target versions.

To set the edit check to run after migration, check the check box In the Select column.
When all selections are made, click the ![]() Save link.
Save link.
The system saves the Edit Check settings to the Migration Plan and displays a success message at the top of the page.
Note: If a data point value referred to in any edit check changes during the migration, that edit check will run in the Target version after migration, regardless of whether the edit check is selected in the migration plan to run. For example, if a data point mapped to a data dictionary entry is deleted, then that data point is re-processed by all edit checks which reference that field or variable.
Copyright © 2014 Medidata Solutions, Inc. All rights reserved.