Select Report Localization
link  on the left
navigation bar on the Report Administration
main page.
on the left
navigation bar on the Report Administration
main page.
Dynamic reports that do not display label text, font, font size, and alignment properly can be adjusted by a Report Developer or a Translator familiar with the locale. Adjustments are made on the Labels Adjustment page for the locale to render the report correctly.
Note: Adjustments are not available for a report in a locale that is marked as Static. This is because static reports are created specifically for the locale.
Access to the Report Localization user group permission is required to configure and/or make adjustments to existing report locale settings.
A Report Administrator can do any of the following on the Labels Adjustment page:
Select options for Font Family, Font Format properties, and alignment options
Edit Locale text of label and set New Font Family, New Font Size, New Font Style, and New Alignment
Preview the report
Set up display of all settings on one page.
Select Report Localization
link on the left
navigation bar on the Report Administration
main page.
The Report Localization main page will display.
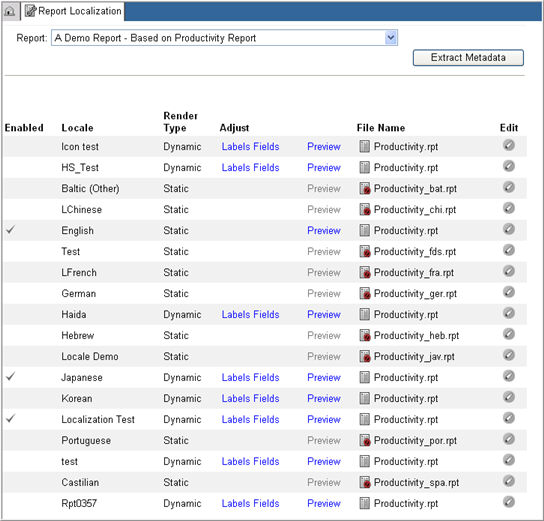
Select a Report Name from the drop down list of Report names.
In the data grid, select a locale for which you want to adjust labels.
Click the Labels link for the locale in the Adjust column.
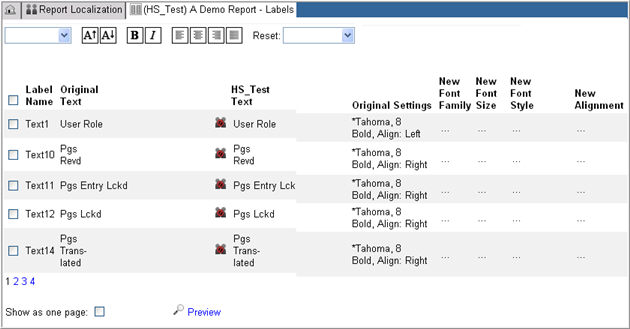
The system will direct you to the Report Labels adjustment page for the locale. The label page will display <Locale description> <Report Name> - Labels. This page is localized.
Select a Font family from the drop down list of available fonts for the Rave installation. The fonts of the selected label (s) will be updated with the font family in the New Font Family column in the data grid.
Click the Increase
size  or
Decrease size
or
Decrease size  icons to increase or decrease the font size
by 10%. The minimum allowed font size is 4pt.
icons to increase or decrease the font size
by 10%. The minimum allowed font size is 4pt.
Click the Bold
 icon to bold
the selected labels.
icon to bold
the selected labels.
Click the Italic
 icon to italicize
the selected labels.
icon to italicize
the selected labels.
Click icons Align left
 , Align
right
, Align
right  ,
Align center
,
Align center  , or Justify
  to align the selected labels
in the report.
to align the selected labels
in the report.
Select any of the font attribute from the drop down list in Reset to clear the attribute for the selected labels. When cleared the original font attribute will be used.
Check box next to the Label Name in the data grid to apply changes made in the Adjust Font and/or Adjust Font size at the top of the page. When the box to the left of the label, Label Name is checked, all labels in the column will be checked.
The <Locale>
Text column contains the current text of the label for the locale
selected. Translated texts are
marked with a  icon
and untranslated texts are marked with a Not
Translated icon
icon
and untranslated texts are marked with a Not
Translated icon  .
Click the <Locale>Text link
for an untranslated text to open the text for adjustment.
.
Click the <Locale>Text link
for an untranslated text to open the text for adjustment.

Adjust and/or translate the text.
Click Save  to update the <Locale> Text or click
Cancel to discard your changes. The new value will be saved and
the icon for the text will change to Translated
. The field will
no longer be available for editing.
to update the <Locale> Text or click
Cancel to discard your changes. The new value will be saved and
the icon for the text will change to Translated
. The field will
no longer be available for editing.
To adjust New Font Family, click the font family of the label for the locale. A drop down list of available report font families for the locale will open.
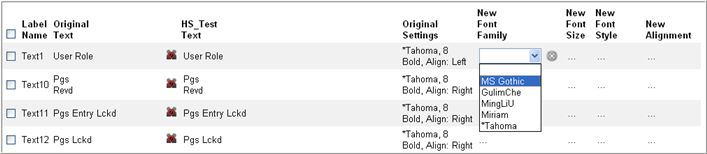
Select an available Font Family from the list. Unavailable fonts are marked with an asterisk. The New Font Family column will refresh with the new value.
To adjust New Font Size, click the font size of the label for the locale. A blank text box will open where you can enter the new font size.

Enter a font size and click
Save or click Cancel
 to discard your
changes. The new value will be saved.
to discard your
changes. The new value will be saved.
To adjust New Font Style, click the font style of the label for the locale to see a drop down list of available styles - Regular, Bold, Italic, and Bold Italic.
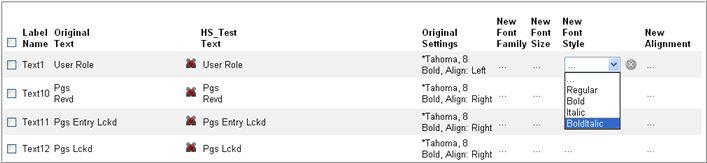
Select a new font style. The New Font Style column will refresh with the new value.
To adjust New Alignment, click the font alignment of the label for the locale to see a drop down list of available alignment styles - left, Center, Right, and Justified.

Select an alignment option. The New Alignment column will refresh with the new value.
Note: The New Font Family, New Font Size, New Font Style, or New Alignment columns will be blank until an adjustment is made. If there is no value, the column will display an ellipse (...). If any or all of these columns are blank, the original settings will be used for the locale.
Click the Preview
link  to view a
preview of the report.
to view a
preview of the report.
Note: In order to preview a report, the report developer must save the Crystal Report file with data. The system will display an error if you attempt to preview a report with no saved data.
Check box Show As One Page to view all rows in the data grid to appear on one page without pagination. When checked, pagination will be turned off.
![]()
Copyright © 2010 Medidata Solutions, Inc. All rights reserved.