On the Report Manager
page, click Add Custom Report
 .
.
There are five stages to creating a new custom report:
Assign Report name, description, URL, File location, and any additional properties
Select which studies to make the report available in
Define report parameters
Physically create and load the report file and associated store procedure
Complete steps outside the UI for the Custom Report to function.
On the Report Manager
page, click Add Custom Report
.
A blank Report Maintenance page displays to add the new report.
The Report Maintenance page is segmented into the Header and Report Parameters Sections. The Header section displays the Report Name, Description, URL, File Location, Report Locale, Additional Properties, and Parameters Validator. The Report Parameter Definition section of the page includes the Report Parameters table, where you can view, edit, and add parameters for a custom report.

The Active check box is checked by default.
Optional. Check the Encrypt Parameters checkbox. When checked, the parameters will be passed to the report in encrypted form. This means, when the report is rendered, the URL will be encrypted.
Optional. Check the Pass Parameters via Database check box. When checked, the parameters will be passed to the report via the Rave database.
Required. Enter a Name for the report. The name must be up to 50 characters long.
Required. Enter a Description for the report. The description may be up to 50 characters long.
Required. Enter a URL where this report will be published. To configure the URL, please see Related Topics.
To system create a URL, click
the Create URL  icon.
icon.
The system will display a URL Helper field with a system generated URL.

Cut and paste the URL into the URL field.
Click the Validate
URL  icon
to validate the URL.
icon
to validate the URL.
If a URL is valid, the system accepts the URL and displays a message. Otherwise, the system will display an error.
Enter the File Location path on the web server to the actual report. This can be a relative or absolute path. The relative path indicates the pathway is relative to the root of the web application. The absolute shows the file's exact location on the web server.
Required. Select a locale from the drop down list of languages available. Default is set to English.
Enter any Additional Properties (jobs) the report must run prior to running the actual report. The properties must be separated by a semicolon. The system supports the following additional properties:
RequiredStatusesToBeUpToDate=true
This property is used for making all statuses up to date for a report to return accurate information.
NoPromptsPageIfPossible=true
This property is used for making the Assign Report Parameters page optional when running a custom report with customized parameters from within EDC.
Note: This property is predefined for Standard reports and cannot be changed. Navigating to a report from within EDC without visiting the Prompts page is the default behavior for all Standard reports.
DisableExportToPdf=true
This property is used to disable the Export to PDF link on a custom report, including the drop down list of available exporting fonts.
DisableExportToExcel=true
This property is used to disable the Export to Excel link on a custom report.
DisableExportToPdf=true;DisableExportToExcel=true
This property is used to disable both Export to PDF and Export to Excel links on the custom report.
OpenInTheSameWindow=true
This property is set to true for reports that download a file to the client's browser (for example, the Architect Report). When a user clicks "Submit Report" on the Report prompts page, no new window will open. The browser pop-up window will appear prompting the user to either open or save the file.
Note: Additional Properties for Custom Reports can be set up through the Report Maintenance page. For all Standard Reports, additional properties can be set only through a database script.
Select a Parameter Validator source code to specify parameter validation when a Report is run from the Reports Prompts page in Reporter. Options are: T-SQL, C# and VB.Net. Default is Blank. Parameter validation verifies all parameter values selected by the end user are valid as per source code when you click Submit Report on the Report Prompts page.
Note: You can do parameter validation for as many parameters in the report as required, or not at all.
Click Save All Changes to save the report.
The system checks the report configuration and if the entered information is correct, saves the report.
Alternatively, click Check Report to check the report configuration before saving.
The system displays errors when it detects one of the following:
Invalid Report Name (the name must be at least 3 characters long)
Duplicate Report Name
Invalid URL (checks for correct syntax based on the parameters included in the report)
Tokens are not unique within the Report
Invalid File Location path
Deactivation when user saved variations of the report exist.
Select the new custom report in Report Manager.
Select the Maintenance
 icon for the report to navigate to the Report
Maintenance page.
icon for the report to navigate to the Report
Maintenance page.
Click the Study Assignment link.
The Study Assignment page displays.
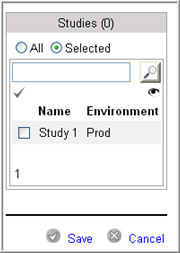
In the Study Filter, All is selected by default to indicate that the report will be available for all studies in the installation, including any new studies that may be added later.
Alternatively, select Selected to select specific studies to make the report available in.
The Study Filter expands to include a search text box and Study Name and Environment columns that includes all the studies available in the installation.
Select the All
checkmark  to select all studies in the study list or check box the study
you want to include from the available list.
to select all studies in the study list or check box the study
you want to include from the available list.
Note: When you select all studies in this manner, a new study added later will not be available for the custom report that you are creating. This is different from selecting the All radio button that is checked by default before you begin your selection.
On the Report Maintenance page, click Add Parameter to add a shared (standard or custom) or local parameter. A Parameter Definition control displays where you can define the parameter definitions.
For more information on this, please see Related Topics.
Click Add Custom Local Parameter link to add a custom local parameter. For information on this, please see Related Topics.
Click Save
All Changes  before exiting the Report Maintenance page. Failure
to do this may result in losing all updated information for the Report.
before exiting the Report Maintenance page. Failure
to do this may result in losing all updated information for the Report.
After a custom report has been defined via the Report Maintenance page, a report (rpt) file must be created and loaded into the applicable web server. If the report requires a store procedure, this must also be created.
Note: Both these procedures are conducted in the back-end because there is no existing front-end interface.
The Report Maintenance page serves as an UI to facilitate the custom report creation process. However, once a custom report is defined on this page, you must complete the following steps outside of the UI in order for the custom report to actually function.
Internally Hosted Report
Create a stored procedure and then contact your systems administrator to create a stored procedure in the Rave database. The name should begin with csp.
Drop the report file, whose name should begin with c (For example, cPatientList.rpt) in the ~/Modules/Reporting/Custom folder.
If this folder does not exist, you must create it.
Set up the report in Report Administration, as explained above.
Externally Hosted Report
There are two options when dealing with externally hosted reports.
Using a proxy page
Drop the proxy page to ~/Modules/Reporting/Custom.
(A proxy page is for example, an aspx file that redirects to somewhere else).
Set up a custom report to point to the proxy page via the URL field on the Report Maintenance page.
Not using a proxy page (or the proxy page is outside of Medidata Rave)
Set up a custom report to point to twhatever the URL is outside of Rave.
Note: A stored procedure is optional in both the externally hosted options. So also, when defining an externally hosted report, the File Name field can be left blank on the Report Maintenance page.
![]()
Copyright © 2010 Medidata Solutions, Inc. All rights reserved.