Navigate to the Custom Parameter page from the Report Administration home page.
On the Custom Parameters page, click Add
Custom Parameter  .
.
A Custom parameter is created by the user and shared across multiple reports. It is defined via the Custom Parameter Definition control on the Custom Parameters page.
Navigate to the Custom Parameter page from the Report Administration home page.
On the Custom Parameters page, click Add
Custom Parameter .
The Custom Shared Parameter Definition section displays at the bottom of the page with empty fields to add the new custom parameter.
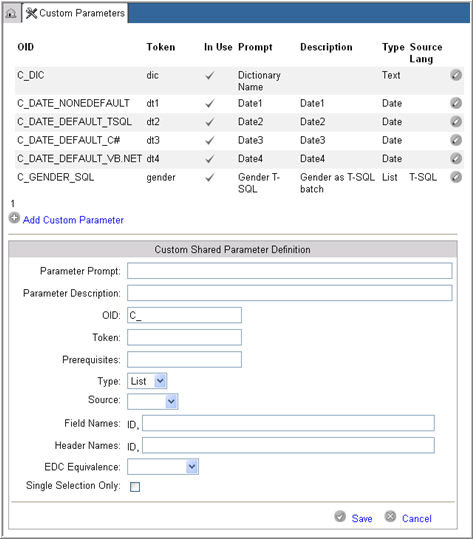
(Required) Enter a Parameter Prompt (or Label) in the free text field. The field must be at least 3 characters long. The prompt will be used to define what the parameter control on the Reporter>Report Prompt page should be labelled.
Enter a Parameter Description in the free text field. This is the parameter description.
Enter an OID in the OID field to uniquely identify the parameter in the Rave database. The OID can be up to 50 characters long and must be unique globally.
Note: When a Custom Shared or Local Parameter is defined, the system automatically prefixes the OID with "C_"
Enter a Token in the free text field. The token must be at least 2 characters long.
Enter any comma separated Prerequisites that are required in the prerequisites text box. They are referred to by their Tokens and indicate that one or more parameters defined here are required as prerequisites for another parameter.
Select a parameter Type from the drop down list of three parameter types - List, Text, Date. Default Type is List. The system bases the fields shown, the syntax required, and how a parameter will display on the Reporter>Report Prompts page on the parameter Type selected here.
Select a Source from the drop down list of four coding languages - T-SQL, C#, VB.Net and XML to indicate what the source language will be when coding parameter behaviour. Default source is Blank. Selecting a source language here will display a large text field. Use this text box to enter the actual code.
Enter a comma separated list in the Field Names text box to specify, from what is returned from the source code, the data that should be used to populate the parameter control's corresponding Headers on the Report Prompts page.
Note: You must specify at least one Field Name in this field. If not, the system will display an error.
Enter a comma separated list in the Header Names text box. This list will be used by .Net controls to represent a parameter control's Heading (s) on the Reporter>Report Prompts page.
Note: You must specify at least one Field Name in this field. If not, the system will display an error.
(Optional) Select an EDC Equivalence from the drop down list of choices - st-Study; si-Site; su-Subject.
Note:When creating a custom report, you can choose not to include standard parameters (study, Site and/or Subject) and yet have the report assigned to EDC via the Reports Matrix page and executed from EDC. You can do this by indicating what the newly defined parameter's EDC Equivalence is (if required) in the EDC equivalence field. EDC Equivalence are predefined and cannot be changed for Standard Parameters. They must be unique at the Report level.
Check box the Single Selection Only check box to indicate that the parameter being defined can have only one value selected by an end user on the Reporter>Reports Prompts page.
Click Save
 to add the custom parameter or click Cancel
  to discard your changes.
The system confirms that the Parameter definitions have been appropriately entered.
If all information is correct, the system saves the parameter and displays the information in its appropriate columns on the Custom Parameters page. If any of the information is incorrect, the system displays errors as appropriate.
![]()
Copyright © 2010 Medidata Solutions, Inc. All rights reserved.