
Folders may be used to organize forms. For example, if there are several forms that must be completed during a patient's first visit, those forms together can be placed in a folder called Visit One.
Select and navigate to the Project or Global Library Volume main page from the Architect main page.
Select a draft and navigate to the Draft Details page.
Click Folders from the list of Draft Items on the side bar.
The Folder main page displays.
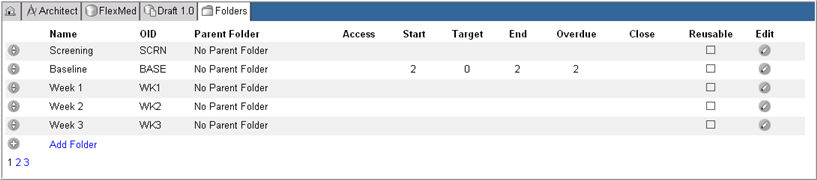
Click Add Folder link.
Empty fields to enter a new folder displays.

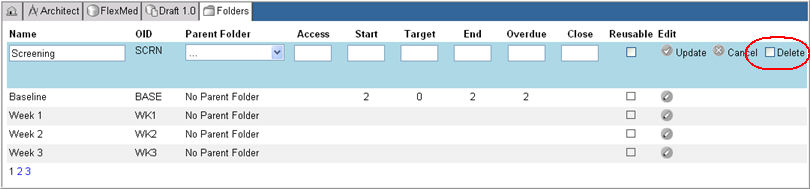
Enter a Name for the folder, OID, select a Parent folder (if required), and in each of the Access, Start, Target, End, Overdue, and Close boxes, enter a number, as described below.
Note: A Parent folder is a folder that contains other folders. The selected folder will contain or nest the new folder that is being created.
Folders can be given a Name, a parent folder, and the following values:
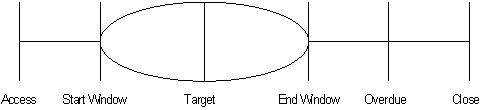
Access:Specifies the number of days before which data cannot be entered into the folder. The folder displays in the task list, but is grayed out and cannot be navigated into. The value specifies the offset in days before the target.
Start Window: Specifies the number of days during which data is expected before the folder Target. The value specifies the offset in days before the Target.
Target: Specifies the target day when data will ideally be entered. The value indicates the offset in days from the time the folder is first created for the subject.
End Window: Specifies the number of days during which data is expected after the folder's Target. The value specifies the offset in days after the Target.
Overdue: Specifies the number of days after which data that has not been entered into the system for the folder is flagged as Overdue. The value specifies the offset in days after the target.
Close: Specifies the number of days after which new data cannot be entered into the folder. If no data is entered into the folder, the folder displays in the task list, but will be grayed out and cannot be navigated into. If there is data in the folder, navigation into the folder can occur. However, new data cannot be entered, but if data has already been entered, it can be changed. The value specifies the offset in days after the Target.
Check box Reusable (optional). When checked, this folder can be re-used.
Note: Reusable folders will only appear one time in the subject matrix.
Click Update to save or click Cancel to discard changes.
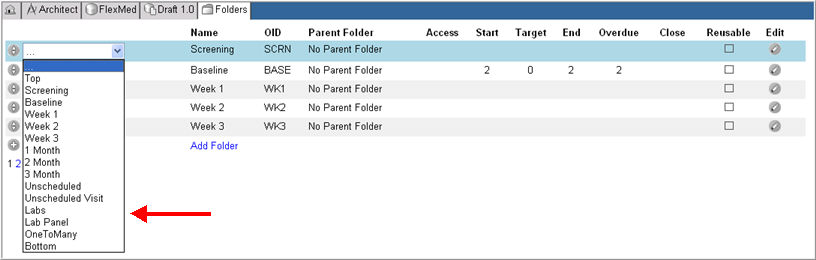
Use the reordering control ![]() to the left of each folder entry.
to the left of each folder entry.
Select a position from the drop down list to move a folder to an appropriate position.
Note: Folders are arranged in the EDC module in the same order they are arranged in the Architect Module.
Select a specific project>specific draft. Click Folders from the list of Draft Items on the side bar.
Click the Edit icon ![]() to edit the folder settings.
to edit the folder settings.
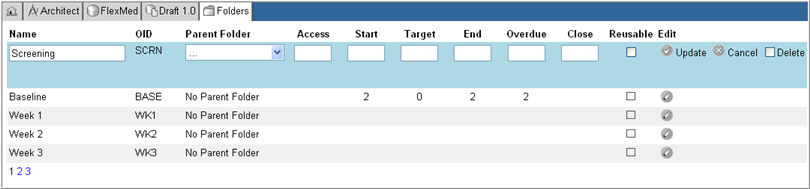
Edit the following settings as required:
Folder Name
Parent Folder
Access Day, Hours, and Minutes
Start Day, Hours, and Minutes
Target Day, Hours, and Minutes
End Day, Hours, and Minutes
Overdue Day, Hours, and Minutes
Close Day, Hours, and Minutes
Reusable - when checked, this folder is reusable
Click Update to save your changes or click Cancel to discard changes.
Select a Project>Draft. Click Folders from the list of Draft Items on the side bar.
Click the Edit icon ![]() next to a folder that is to be deleted.
next to a folder that is to be deleted.
Check box Delete.
Click Update to confirm your deletion.
![]()
Copyright © 2014 Medidata Solutions, Inc. All rights reserved.