Navigate to the Site Administration module from the Home page.
Search and select a study site that you want to assign a default lab.
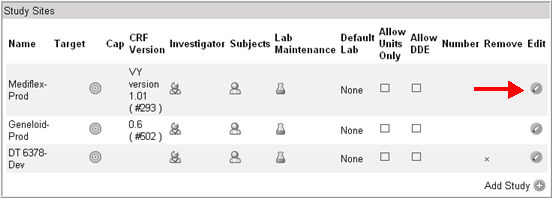
In the Study Sites
section on the Site Details
page, locate a Site and click Edit
![]() .
.
Users can assign a default lab for a study site in Site Administration.
The default labs listed here will trigger the following system or user behavior in EDC:
None - user must select a lab or "Units Only" from the labs drop down list on the eCRF
Local - if there is only one local lab, the system will automatically select it
Central - if there is only one central lab, the system will automatically select it
Units Only - system collects units on the eCRF.
The Units Only default lab captures analyte values and the appropriate units for each analyte on the eCRF in EDC and uses the information for these units to look up standard units, reference and alert ranges (if any). Selecting Units Only enables users to bypass the requirement to add local lab ranges for a lab in situations where entering lab ranges is too complex, or the ranges have not been provided, or the exact lab is not known.
Navigate to the Site Administration module from the Home page.
Search and select a study site that you want to assign a default lab.
In the Study Sites
section on the Site Details
page, locate a Site and click Edit
![]() .
.
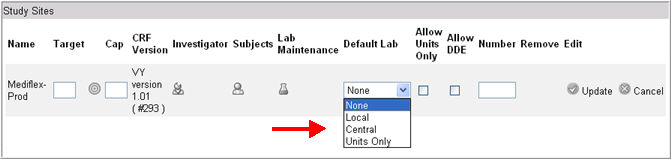
The site information displays in edit mode.

Select a Default lab from the drop down list of values. Default selection is None.
The available values are: None, Local, Central, and Units Only.
If you select Units Only default lab, you must also check the Allow Units Only check box. This is because in order to select Units Only as the default lab, it has to be allowed first. This ensures that "Units Only" lab functionality is independent of default lab type selected on the lab eCRF. In other words, you can select "local lab" or "central lab" with or without the existence of a "Units Only" lab in the labs drop down list on a lab eCRF.

Note: Selecting Units Only default lab will trigger the following behavior in Rave EDC:
Rave will not look up lab ranges
The system will capture the analyte values and the appropriate units for each analyte and will use this information to look up standard units, reference and alert range (if any).
Values outside the reference range will not prompt for clinical significance because reference ranges are for reporting purposes only.
Values outside the alert range will prompt for clinical significance.
Click Update
![]() .
.
![]()
Copyright © 2014 Medidata Solutions, Inc. All rights reserved.