Click the arrow icon ![]() for the Field Presentation setting for the new field.
for the Field Presentation setting for the new field.
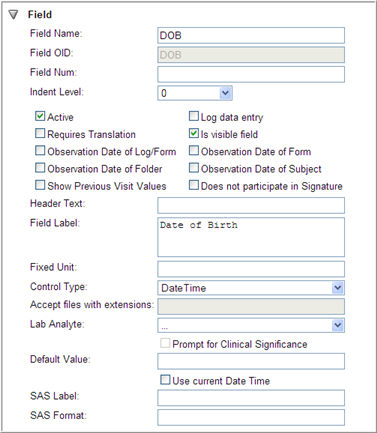
A user must specify the following field presentation details for a new field:
Field Name - Field Name is the localizable version of the Field OID. Field Name must be unique within a form. Field Name is required. Field Name can be (and often is) the same as the Field OID.
Field OID - The unique identifier for the field. Field OID is required.
Field Num - A number that can be displayed to the right of a field label in EDC to create a numbered list on the form.
Indent Level - The level of indentation of a field from the left-hand page margin.
Active - When checked, the field will be displayed on the form when the version is pushed to EDC.
Log Data Entry - When checked, displays the selected field as a log field, allowing multiple instances of data to be recorded.
Requires Translation - When checked, enables translation functionality for the selected field.
Is Visible Field - When checked, the selected field will be displayed on the form when the version is pushed to EDC.
Visual Verify in Second Pass - when checked, the selected field will be pre-filled with user-entered data during the Second Pass phase of Double Data Entry. This option is only displayed if a form is set to require DDE As Per Site or Always.
Observation Date of Log/Form - If a form contains only standard (non-log) fields, Observation Date of log/Form assigns the date entered into the field as the date for the form, and will be used to logically order the form by date when compared to other instances of the same form. If a form contains log fields, Observation Date of log/Form assigns the date entered into the field as the date for the record (log line).This field is Optional and is available for selection only when a control type of date or time is selected.
Observation Date of Form - Observation Date of Form assigns the date entered into the field as the date for the form, and is used to logically order the form by date when compared to other instances of the same form. This field is Optional and is available for selection only when a control type of date/time is selected.
Observation Date of Folder - Observation Date of Folder assigns the date entered into the field as the date for the folder, and is used to logically order the folder by date when compared to other instances of the same form in other folders. This field is Optional and is available for selection only when a control type of date/time is selected.
Observation Date of Subject - Observation Date of Subject assigns the date entered into the field as the date for the Subject. This field is Optional and is available for selection only when a control type of date/time is selected.
Show Previous Visit Values - If checked, the field can display previous visit data. If Log Data Entry is checked, Is Other Visit Capable cannot be used. This field is Optional.
Does not participate in Signature - If checked, the field (both derived and non-derived) will not participate in signature.
Header Text - An alternate field label that is displayed for log fields when displayed in landscape view.
Field Label - This is the field description. This description gives the user direction as to how the field on the form should be completed.
Fixed Unit - Additional field text that appears to the right of the data entry point
Control Type - the control type dictates how the end-user can enter data into the system. Control type is selected from a drop down list.
Accept Files with Extensions - Selecting Control Type "File Upload" will enable a new text field Accept files with extensions where you can specify multiple file extensions separated by a comma.
Lab Analyte - If the field is associated with an Analyte Library, select an Analyte from the drop down list of all active Analytes defined for the installation.
Prompt for Clinical Significance - if an Analyte is selected, this checkbox becomes available for selection.
Default Value - To display a default value in a text box, enter the desired value into the Default Value field. This can be overwritten by the user.
Use Current Date Time - When the Use Current Date Time option is selected, the current date, displayed in the date format configured in the system, is populated.
SAS Label - An optional SAS label can be entered for a field in the SAS Label text box. SAS labels may be alphanumeric, with a maximum of 256 characters. Once entered and saved, the SAS Label is stored and is accessible in the database.
SAS Format - An optional SAS format can be entered for a field in the SAS Format text box. Once entered, the SAS Format is stored and is accessible in the database.
Click the arrow icon ![]() for the Field Presentation setting for the new field.
for the Field Presentation setting for the new field.
The Form Field Designer displays with empty fields.
Enter a Field name if you selected a variable and/or domain. Or click Apply Variable in the variable window where you entered a variable OID.
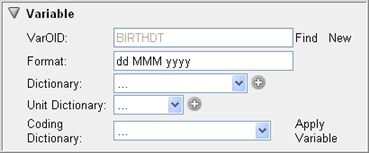
The system automatically populates the Field name and the Field OID with the Variable OID.
Note: If the same variable is used more than once on the form, then you must enter a unique field name.
Enter a Field OID if the system does not automatically apply the variable OID.
Field OID must be unique within the Form that it resides in. The Field OID must be:
minimum 1 alphanumeric character
maximum 50 alphanumeric characters
no spaces
no special characters
Note: If a field is used for requesting replacement kits for subjects from Medidata Balance, typically on a dispensation form, the Field OID must be labelled ITEMS.
(Optional) Enter a Field Number.
(Optional) Specify an Indent level (optional) from the drop down list.
Check the Visual Verify in Second Pass (if displayed) check box to set the field as a Visual Verify field in DDE. Data in a Visual Verify field is carried over from Pass 1 to Pass 2. The user is not required to re-enter data in this field and can visually verify its accuracy.
Note: The Visual Verify in Second Pass check box will only display if the corresponding form is flagged as Always (MustDDE) or As per site (MayDDE) in the Form Designer. If it is flagged as Never (MustNotDDE), the check box will not display.
(Optional) Check the Active check box if you want this field to be active.
(Optional) Check the Requires Translation check box (if displayed) only if field is not associated with an Analyte.
Note: Only fields with control type Drop down list, Radio button , and Text (string format starting with $) can be flagged for translation.
(Optional) Check the Show Previous Visit Values check box if Log Data Entry is unchecked.
(Optional) Check the Log Data Entry check box if this field is a log field.
Note: A lab field cannot be a log field. If a field is associated with an Analyte, you cannot check the Log Data Entry checkbox. The system will display an error.
(Optional) Check box Observation Date of Log/Form if control type is DateTime.
(Optional) Check box Observation Date of Folder if control type is DateTime.
(Optional) Check box Is Visible Field. It is checked by default.
(Optional) Check box Observation Date of Form if control type is DateTime.
(Optional) Check box Observation Date of Subject if control type is DateTime.
Check the Does not participate in Signature check box if field should not participate in signature. The check box is unchecked and disabled for signature fields.
Note: Fields of the type "Signature" cannot be assigned as "Does not participate in Signature". Users can be prevented from modifying this field fa flag in Architect Security Roles Actions.
Enter the Header Text that you want displayed on the CRF.
Enter a Field Label. This is the label that displays on the CRF.
(Optional) Enter a Fixed Unit. This Fixed Unit displays on the CRF form after the data entry field.
Select a Control Type from the drop down list of Control Types available. The control type must match the Variable format. For example, if the Format is a DateTime format, the control type must be DateTime.
Check Box
Date Time
Drop Down List
Dynamic Search List
Note: Selecting control type Dynamic Search List will result in a drop down pick list field in EDC. The contents of the drop down list will vary according to the selection in a previous drop down list. For example, if a "Surgical Implant" form contains two fields, namely, "Device Type" and "Device", the list of values for the "Device" drop down list will be different based on the device type selected in the previous field. Note also that this control type will not be available for Date fields.
File Upload
Note: Selecting Control Type File Upload will enable a new text field Accept files with extensions where you can specify multiple file extensions separated by a comma. The file extensions you specify here are the only file types that will be allowed when a user uploads a file or image in EDC. File types .exe, .com, .bat, or .js are invalid and will be disallowed by the system upon Save.
Long Text
Radio Button
Radio Button (Vertical)
Search List
Note:The Search List control type is applicable only for a field that has a data dictionary associated with it. Selecting this control type for a field that is not associated with a data dictionary will display an error.
Signature
Text
If the field is associated with an Analyte Library, select a Lab Analyte from the drop down list of all active Analytes defined for the installation.
If a clinical significance code is necessary for the Analyte, check Prompt for Clinical Significance Code check box.
(Optional) Enter a Default Value for the field (Text, Long Text, DateTime control type only)
Note:If this is a log form, it is possible to automatically generate multiple occurrences of a log field in the log form, with each record having a different default value. You can specify multiple defaults for a log field by using a configurable delimiter (default is the pipe character |) in the Default Value for a log field. If the system detects the delimiter character within the default value for a log field, it will parse the delimited string into a set of values. This delimited list of default values will cause the log form to be generated with multiple occurrences of that log field when a new, empty data page is created in EDC, for instance, as part of adding or merging a matrix.
You can specify multiple defaults for the log field by referencing a Data Dictionary. The delimited list (elements between each delimiter) should contain the desired Coded Data from that Data Dictionary (For example, M|F from the Gender Dictionary). The resulting log form will display the corresponding User Data String for each of the Data Dictionary entry (For example, Male or Female from the Gender Dictionary).
(Optional) If this is a Log form and you want to set the maximum number of log lines allowed for this form, enter a default separator (that is, % or |) as the last character in the Default Value list. This will ensure the following:
The Total number of Log Lines is equal to the number of default values. For example, if a log field is defined with 3 defaults, then if a delimiter exists, then only 3 log lines, one for each default value, will display for the form in EDC.
No additional lines can be created on this log form.
Users will not be able to inactivate log lines.
Note: If there are multiple fields on a log line with a Default value list ending with a default separator, the field with the greatest number of default values will be used to determine the total number of log lines. However, if there are multiple fields with Default values lists, and the field with the greatest number of Default Values does not end in a separator, and another field with fewer Default Values DOES end in a separator, the changes will not be saved. This is because only the field with the greatest number of default values will be used to determine the total number of log lines.
Check box the Current Date Time if you want to use the current date time as the default value for the field.
(Optional) Enter an SAS Label in the text box. This is the label for the SAS variable for the field. It can be an alphanumeric label with a maximum of 256 characters.
(Optional) Enter the SAS format for the SAS variable. It can be in an alphanumeric format up to a maximum of 25 characters.
Note: The SAS Label and SAS Format are stored and accessible in the database.
The system updates the field details for the new field.
![]()
Copyright © 2014 Medidata Solutions, Inc. All rights reserved.